Monday, April 25, 2011

Isolating DNA -- a long polymer chain

DNA, which stands for Deoxyribonucleic acid, is made up molecules known as nucleic acids. These were first identified by Swiss physician and biologist Johannes Friedrich Miescher in 1869, who called them “nuclein” because they were found in the nucleus of the cell. Every type of life form known contains nucleic acids, in the form of DNA or RNA (ribonucleic acid).

Oswald Avery received the Nobel Prize in 1943 for confirming that DNA carried genetic information. Each strand of human DNA is divided into 23 pairs of chromosones, which in turn contain hundreds or thousands of genes. Genes record information in the form of chemical codes about how to build the proteins and other molecules which make up living organisms.

DNA is one of the longest type of polymers, or chains of molecules. Strands of human DNA are 6 feet long. In 1950, scientist Rosalind Franklin used X-ray crystallography to find that DNA is made up of two long polymers, or chains of molecules, twisted into a shape called a double helix. In 1953, James Watson and Francis Crick discovered that the strands were connected by crossbars, like a ladder. They won the Nobel Prize in 1962 for uncovering DNA’s structure.


Isopropyl (rubbing) alcohol (70 or 91 percent)
Clear plastic cups
Plastic spoons
Small plate (preferably disposible)
Drinking water
Salt
Dish soap
Blue food coloring (optional)


Step 1: Chill the alcohol
Place the bottle of alcohol in the freezer to chill while preparing the next steps. (Do not leave in long enough to freeze!)


Step 2: Gather the DNA
In the plastic cup, mix ¼ teaspoon of salt in 1/4 cup of water. Swish the salt water around in your mouth for a minute, making sure it reaches the inside of your cheeks. Spit all the water back in the cup. Do not swallow! (If you prefer, you can also use Gatorade, which is sweeter.)

Cells from the inside of your cheek mix with the salt water and are carried away when you spit. Above is a photograph of cheek cells under a microscope. You can see the nucleus inside each cell.


Step 3: Release the DNA from your cheek cells
Put a drop of dish soap on the plate. Touch the spoon to the soap, and then dip it in the cup of salt water. Gently stir once or twice. Cells are contained within membranes that are made up of fats. The soap solution breaks down the fat molecules, just like soap breaks down grease on your dishes, and releases the contents of the cell.


Step 4: Add the alcohol
Remove the alcohol from the freezer. Pour about a quarter of a cup into a second plastic cup. If desired, add a drop of blue food coloring to make the alcohol easier to see. Stir until evenly mixed. Take the salt water cup and tilt to one side. Hold the cup of alcohol up so that the lip touches the tilted cup. SLOWLY pour a little alcohol down the inside of the cup so that it floats on top of the salt water without mixing. Continue until there is about an eighth of an inch of alcohol on top of the salt water.


Step 5: Watch the DNA strands appear
Wait a few minutes and you will see long strands or clumps of a sticky white substance start to come together in the alcohol layer. This is the DNA from thousands of cheek cells in the salt water. The DNA cannot dissolve in the chilled alcohol, so it precipitates out (comes out of solution as a solid).
Variation: If you want to remove the DNA to look at it through a microscope, dip a toothpick into the alcohol layer and twirl it to gather up the sticky DNA. Place on a glass microscope slide. You can also save the DNA in a small clear container with a little extra salt water. Keep tightly covered.

More information:

http://tang.skidmore.edu/pac/mtm/DNA/index.html
www.nespal.org/oziasakinslab/edout/AnimalDNAExtraction.pdf
http://www.vampirewear.com/dna.html
http://nature.ca/genome/05/051/0511/0511_m204_e.cfm
http://www.californiasciencecenter.org/Education/GroupPrograms/HomeSchool/docs/DNA.pdf

Tuesday, April 12, 2011

Splitting Saltwater


Last week we watched an episode of  The Joy of Science dealing with elements that have an affinity for one another, like sodium and chlorine.  In the great Theo Gray book Mad Science, he shows that combining sodium and chlorine to make your own salt results in quite a bang.I was looking for other interesting sodium-related YouTube videos when we came across one that showed a cool way to split salt into its component elements.

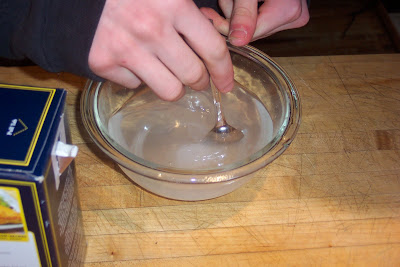
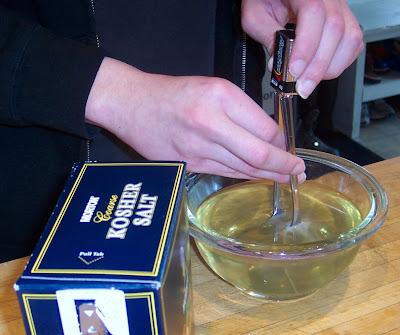
Above you can see our version of the experiment. What we did is explained below.


Saltwater Electrolysis

Materials:

-Salt
-One 9-volt battery
-Two spoons
-A medium-sized glass bowl


Steps:

1. Fill the bowl with warm tap water, and stir in a spoonful or so of the salt.


2. Place the two spoons in the water, being careful not to let the two spoons touch each other.

 3. Hold the ends of the two spoons to the battery connectors, one spoon on each connector.


4. Within a few seconds, you should see tiny bubbles coming off of the spoons. You will also notice what looks like smoke coming off the water.

5. After holding them in a minute or so, you should be able to see the water begin to turn murky yellow.

6. After several minutes, the water starts to turn dark green.


Here is an explanation of what's happening (from the NASA Aquarius website):

In chemistry, electrolysis is a method of separating bonded elements and compounds by passing an electric current through them. An ionic compound, in this case salt, is dissolved with an appropriate solvent, such as water, so that its ions are available in the liquid. An electrical current is applied between a pair of inert electrodes immersed in the liquid. The negatively charged electrode is called the cathode, and the positively charged one the anode. Each electrode attracts ions which are of the opposite charge. Therefore, positively charged ions (called cations) move towards the cathode, while negatively charged ions (termed anions) move toward the anode. The energy required to separate the ions, and cause them to gather at the respective electrodes, is provided by an electrical power supply. At the probes, electrons are absorbed or released by the ions, forming a collection of the desired element or compound.

One important use of electrolysis is to produce hydrogen. The reaction that occurs is 2H2O(aq) → 2H2(g) + O2(g). This has been suggested as a way of shifting society towards using hydrogen as an energy carrier for powering electric motors and internal combustion engines. Electrolysis of water can be achieved in a simple hands-on project, where electricity from a battery is passed through a cup of water (in practice a saltwater solution or other electrolyte will need to be used otherwise no result will be observed). Electrolysis of an aqueous solution of table salt (NaCl, or sodium chloride) produces aqueous sodium hydroxide and chlorine, although usually only in minute amounts. NaCl(aq) can be reliably electrolysed to produce hydrogen. Hydrogen gas will be seen to bubble up at the cathode, and chlorine gas will bubble at the anode.
According toWikipedia, this is the formula for the chemical reaction taking place:

2 NaCl + 2 H2O → Cl2 + H2 + 2 NaOH

That means, two sodium chloride molecules (which is the salt) plus two dihydrogen monoxide molecules (also known as water) becomes one chlorine molecule, one hydrogen molecule, and two molecules of sodium hydroxide (which is also known as lye). So in our experiment, the bubbles were hydrogen, the "smoke" coming off the water was chlorine gas, and the yellow color of the water was the sodium, in the form of lye.

Friday, April 1, 2011

Observing Energy Levels of Electrons Using a Cereal Box


In our most recent episode of The Joy of Science, Dr. Hazen describes observing energy levels of electrons and atoms using a Spectroscope. So, for science this week, we decided to make a Spectroscope out of a cereal box and diffraction grating glasses. We used it to look at different light sources.


Spectroscopy is the study of light-matter intersections. By using a spectroscope, scientists make a record of the light intensity over a range of wavelengths. Each element produces its own spectrum, and many new elements were discovered by this method. Astronomers use spectroscopy to figure out the composition of stars and whether they are moving towards or away from the earth.


The way spectroscopes work is by breaking light up into its different wavelengths. The light can be viewed through a filter (as we did in this version) or reflected off an object's surface (as we did in a version we made a few years ago; see below).


This photo was shot using the diffraction grating glasses
before we taped them to the Spectroscope.


For our diffraction grating, we took a pair of  cardboard holographic glasses and cut them in half. We made two Spectroscopes, so we used one half for each one.

Next we took the cereal box, placed the diffraction grating on top, and outlined it using a sharpie. We made marks to indicate where the actual lens was. Then we opened the flaps and cut a hole the size of the lens in the cereal box.

We then taped the cereal box flaps closed and taped the grating over the opening.


On the opposite side of the box from the grating, we made a mark and cut a very narrow slit. During our first attempt at the spectroscope, we made the slit wider than recommended. We fixed this by taping a piece of card stock over the slit and cutting through that. However, a different set of directions suggested using a wider slit, so we also tried taking photos with the original slit as well.

Fluorescent light, using wider slit.


After completing it, we took some photos by holding the camera up to the grating, and pointing the Spectroscope towards a light. The result was the photo shown at the top of this post.

Detail of fluourescent light spectrum

Here is a cropped version of the photo above, showing the bright lines of higher intensity at different wavelengths. Scientists use this kind of spectrum to analyze what elements are present in a light source. Our grating was not as high a resolution as a real Spectroscope, so it was harder to use. Our spectrum is more an approximation.

For more precision, you can try the directions for a homemade high-resolution Spectroscope from Simon Field at SciToys.com. A few years ago, we made his version of a Spectroscope using an old DVD. (It's also in his book, Gonzo Gizmos: Projects & Devices to Channel Your Inner Geek.)

Here's a site with really nice photos taken with a cereal box/CD type spectroscope.