Showing posts with label electricity. Show all posts

Friday, June 17, 2011

Foam Plate Speakers


For science this week, we decided to experiment more with audio devices. (The episode of  The Joy of Science we had just watched was about properties of matter, including magnetism, and mentioned that speakers worked because magnets changed shaped.) Since we had already built a radio, this time we built a speaker. The speaker was much easier to make and much less elaborate than the radio, and we were able to have it working in about a half-hour. Despite requiring some fine-tuning, we were able to get it to work very well.

This simple and elegant project was designed by Jose Pino. You can see it being made in this Make Magazine YouTube tutorial.

We didn't test our speaker out with our foxhole radio, because the volume is so low on both devices. Instead we used an mp3 player. But we plan to try our homemade radio with the speaker sometime in the future.


Materials:

A foam plate
Two strips of paper
Two business cards (we just cut an index card in half for this)
Tape
A hot glue gun
Magnetic copper wire (Jose Pino recommends using AWG 32)
Neodymium magnets
An audio plug
A piece of cardboard

1. We started by rolling one of the strips of paper over the magnets. We then taped the roll closed, being careful not to tape it to the magnets.

2. Next, we rolled the other strip of paper around the first strip, and taped it closed. We cut this strip a little less wide than the first. This made the outer strip stick out a bit more than the inner one.

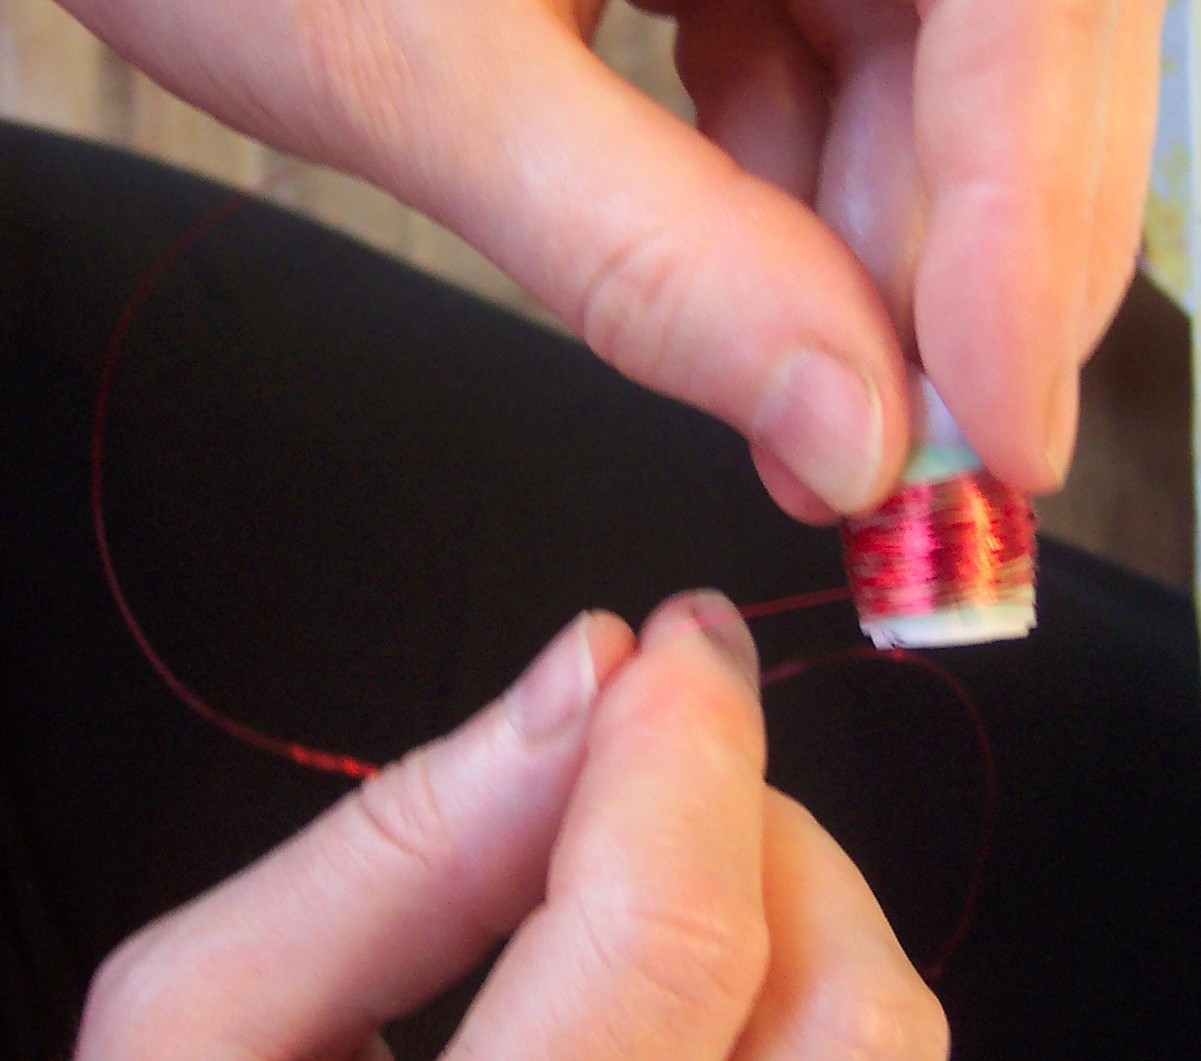
3. Keeping the magnet inside the tubes of paper, we coiled the copper wire around it, using about 50 turns. Leave a few inches of copper wire uncoiled on each end.

4. We then pulled the magnet out of our paper, along with the inner strip (we made it wider so that it would be easier to pull out.)

5. Discarding the inner strip, we then hot-glued the outer to the bottom of the foam plate, being careful to have it in the center.

6. Next, we hot-glued the magnet to the cardboard. After that, we folded the business cards in an accordion shape, we glued them to the bottom of the plate, one on each side of the coil. We then put hot glue on the bottoms of the cards, and glued them to the cardboard base, making sure that the coil would go over the magnet.

7. We tested the wires by touching the ends to either end of a battery. This is what happened:


8. To connect our speaker to a sound system, we needed an audio plug. We got one by cutting the end off a cheap set of earbuds from the dollar store. FIrst we had to sand off the coating from each end of the copper coil wire and strip the rubber insulation from the ends of the audio plug. Because the earbuds were stereo, we needed to connect one wire from each earbud to each of the copper coil wires in order to hear both sides. (We're not sure that worked well, though.)

9. Finally, we plugged the audio wire into a music device. We found that MP3 players worked the best.


How it Works:

The speakers operate largely on the same principle as the piezoelectric earpiece we used in our radio experiment. The coil serves as an electromagnet. It receives electrical currents from the audio plug, which gives it either a stronger or weaker attraction to the magnets. This causes the foam plate to bounce up and down, creating sound vibrations.

Thursday, May 5, 2011

Plasma: The Fourth State of Matter


This week's episode of The Joy of Science was about States of Matter. Most people are familiar with three: solid, liquid, and gas. But there is a fourth state of matter: plasma.

Plasma is a gas-like field made up of charged atomic particles – negative electrons and positive ions (atoms which have lost some of their electrons, and so have an excess of positrons). As they move, these particles generate electricity and magnetic fields. Plasma requires low pressure and extremely high temperatures. On Earth, plasma only occurs naturally in the form of lightning, polar auroras, and extremely hot flames. However, plasma is actually the most common state of matter in the universe, since it makes up stars and other celestial bodies, as well as the space in between.

Plasma was first identified in 1879 by Sir William Crookes, who called it "radiant matter." It can be created artificially by running an alternating electric current through certain types of gas in vacuum tubes. This “knocks electrons” off the atoms inside.

In this experiment, we decided to use a plasma globe to observe some properties of plasma. A plasma globe is a type of lamp that you can buy in a novelty shop, museum gift shop, or through a science supply house. Inside the glass bulb of the plasma globe is a Tesla coil. This creates a plasma field of electrically charged particles, which look like small tendrils of lightning.


When we turned the plasma globe on and touched the glass, the tendrils of lightning concentrated at the spot that was touched. Touching it in more than one place at the same time created several points of concentration. Our plasma globe also had a setting that made it react to sound waves. We put mp3 speakers next to it and watched it flick on and off in relation to the music. Interestingly, it was more affected by frequency (how high or low the note was) than to volume. It reacted very strongly to particular notes and not at all to others. This reminded us of seeing the band ArcAttack at Maker Faire NY. ArcAttack creates music using giant Tesla coil-driven plasma arc speakers.


The first experiment we did was to hold different kinds of unplugged light bulbs near the globe. As described on the Plasma Ball experiments page on the Wonders of Science website from the University of Wisconsin, some electrons from inside the globe travel through the glass to the light bulbs.


Inside the bulbs are gas molecules. In fluourescent bulbs, molecules of mercury vapor become excited by the energy of the charged particles bombarding them from the plasma field. Electrons in the mercury atoms make a quantum jump to a higher energy level (or shell) around the atom's nucleus. When they return to their previous energy level, the extra energy is given off in the form of light. When they are plugged in, fluourescent tubes also operate by creating plasma fields out of the mercury gas.

We got good results with fluorescent and neon lights, above and in the videos below. We also tested Halogen and Xenon bulbs, but were unsuccessful.


Our second experiment was more elaborate. First, we balanced a penny on the top of the globe. Next, we took another penny, and close to the penny balanced on the dome, but not touching it. As in the first experiment, some electrons from the plasma field traveled through glass and were carried by the penny on top as an electrical current. The penny was able to carry a current because they are made out of a conductive material, copper. Holding a second penny above the first drew the electricity throught the air, creating a tiny spark. You can just barely see the spark in the photo below; in the video you can see and hear the tiny crackle as the pennies spark.


We also tried sending sparks to our fingers. We found that, if we weren’t grounded, we could send a spark from the penny to one of our fingers without feeling a shock!

Stay tuned for more exciting plasma experiments in the second part of our report on States of Matter!

Monday, December 27, 2010

The No-Frog Battery


In Lecture 12 of The Joy of Science, Prof. Robert Hazen tells the story of the first electric battery. In 1799, Alessandro Volta was the first person to devise a way to chemically generate electricity without the use of frogs. I decided to try this experiment at home.

Luigi Galvani and his wife Lucia discovered that dissecting frog legs
with a scapel near an electrostatic generator caused the muscles to jump.

We had tried to make a Lemon Battery back when we were doing chemistry. We were not successful. I was all ready to go out and buy a bag of lemons and try again, when I came upon this Tiny Lemon Battery Instructable. The author shows many different ways to create what one commenter dubbed "nano-batteries" using the bare minimum of materials and only a few drops of lemon juice. Since I had a bottle of lemon juice in the fridge, and the other materials were easily scrounged from our science and art supplies, we were able to make a few different types of batteries in the course of a morning -- two of which actually worked!

Method One: Copper and Aluminum Foil Batteries


Materials

copper foil (available in craft stores)
aluminum foil (from the supermarket)
facial tissue (Kleenex)
multimeter or voltmeter
disposable plate (to work on)
dish soap or lemon juice

  1. Cut a piece of copper foil about 1 inch by 2 inches.
  2. Separate the tissue into layers. Cut a piece about 1 inch by 3 inches.
  3. Cut a piece of aluminum foil about 2 inches square.
  4. Layer the materials so that the aluminum foil is on the bottom, the tissue is in the middle, and the copper is on top. Fold the aluminum foil so that the edges wrap around the tissue and copper foil as shown above. This is your battery.
  5. Place the battery on a plate. Soak the paper with either dish soap or lemon juice. (We tried one of each.)
  6. With your voltmeter, measure the voltage generated by placing one terminal on the copper and one on the aluminum. We got up to half a volt of electricity from our primitive Galvanic cell batteries.

Method Two: Copper and Zinc Wire Battery

Materials
2 inch long piece of zinc-plated steel wire ("galvanized" picture-hanging wire works well)
4 inch long piece of uncoated copper wire, as thin as possible
a layer of Kleenex (see above)
disposable plate
lemon juice or dish soap

  1. Cut a piece of tissue about 1 1/2 inches long and 1/2 inch wide.
  2. Wrap the tissue layer around the steel wire, leaving the ends uncovered.
  3. Coil the copper wire around the tissue, being sure not to touch the steel wire inside. Make the coils as close together as possible without overlapping. 
  4. Soak the paper in lemon juice or soap as above and measure the voltage!
The Instructables page has directions for several variations, which include making several batteries and attaching them in series to light an LED, and flower and animal "sculptures" which use lemon juice to light up attached LEDs using the same techniques. One variation which we tried but did not (yet) get to work was to make tiny batteries from coils of wire inside lemon juice-filled drinking straws sealed with hot glue. Although the cells we made looked right, we could measure no voltage from them. We'll write an update post when we've got a few more designs to show off!