Pages

Monday, December 27, 2010

The No-Frog Battery


In Lecture 12 of The Joy of Science, Prof. Robert Hazen tells the story of the first electric battery. In 1799, Alessandro Volta was the first person to devise a way to chemically generate electricity without the use of frogs. I decided to try this experiment at home.

Luigi Galvani and his wife Lucia discovered that dissecting frog legs
with a scapel near an electrostatic generator caused the muscles to jump.

We had tried to make a Lemon Battery back when we were doing chemistry. We were not successful. I was all ready to go out and buy a bag of lemons and try again, when I came upon this Tiny Lemon Battery Instructable. The author shows many different ways to create what one commenter dubbed "nano-batteries" using the bare minimum of materials and only a few drops of lemon juice. Since I had a bottle of lemon juice in the fridge, and the other materials were easily scrounged from our science and art supplies, we were able to make a few different types of batteries in the course of a morning -- two of which actually worked!

Method One: Copper and Aluminum Foil Batteries


Materials

copper foil (available in craft stores)
aluminum foil (from the supermarket)
facial tissue (Kleenex)
multimeter or voltmeter
disposable plate (to work on)
dish soap or lemon juice

  1. Cut a piece of copper foil about 1 inch by 2 inches.
  2. Separate the tissue into layers. Cut a piece about 1 inch by 3 inches.
  3. Cut a piece of aluminum foil about 2 inches square.
  4. Layer the materials so that the aluminum foil is on the bottom, the tissue is in the middle, and the copper is on top. Fold the aluminum foil so that the edges wrap around the tissue and copper foil as shown above. This is your battery.
  5. Place the battery on a plate. Soak the paper with either dish soap or lemon juice. (We tried one of each.)
  6. With your voltmeter, measure the voltage generated by placing one terminal on the copper and one on the aluminum. We got up to half a volt of electricity from our primitive Galvanic cell batteries.

Method Two: Copper and Zinc Wire Battery

Materials
2 inch long piece of zinc-plated steel wire ("galvanized" picture-hanging wire works well)
4 inch long piece of uncoated copper wire, as thin as possible
a layer of Kleenex (see above)
disposable plate
lemon juice or dish soap

  1. Cut a piece of tissue about 1 1/2 inches long and 1/2 inch wide.
  2. Wrap the tissue layer around the steel wire, leaving the ends uncovered.
  3. Coil the copper wire around the tissue, being sure not to touch the steel wire inside. Make the coils as close together as possible without overlapping. 
  4. Soak the paper in lemon juice or soap as above and measure the voltage!
The Instructables page has directions for several variations, which include making several batteries and attaching them in series to light an LED, and flower and animal "sculptures" which use lemon juice to light up attached LEDs using the same techniques. One variation which we tried but did not (yet) get to work was to make tiny batteries from coils of wire inside lemon juice-filled drinking straws sealed with hot glue. Although the cells we made looked right, we could measure no voltage from them. We'll write an update post when we've got a few more designs to show off!

Wednesday, December 15, 2010

Second Law of Thermodynamics -- Keeping Butter Cool with Evaporation

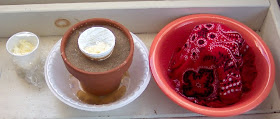
The setup. Left to right: the control, Anthony's experiment (The cup of butter was kept in wet sand,) and John's experiment, (The butter was put in a bowl of water, and covered by a ceramic pot and a cloth.)

After watching The Joy of Science lecture about the Second Law of Thermodynamics, I decided to spend a week focusing on entropy. Entropy is a concept that has always interested me, although I don't understand very well. I first read about it in a short story by Thomas Pynchon, and then ran into it again when I saw Tom Stoppard's play Arcadia. But despite its interest for writers, it doesn't seem to have inspired a lot of popular science videos we could watch. The only mention I could find in the archives of what is now my favorite science show, NOVA, was a show about Absolute Zero. Luckily, this topic proved to be interesting in its own right.
The Teachers Guide for NOVA programs often contain good hands-on science activities. In this case, however, I thought the activity -- using a thermometer to calibrate a homemade thermometer -- was a tad lame. But a mention in the show about the discovery that evaporating chemicals could be used to produce refrigeration did catch my attention. I started Googling for safe classroom-type activities the kids and I could do to recreate the 1823 experiment by Michael Faraday, but perhaps without the potentially explosive chlorine.

Taking the temperature of butter in a Butter Keeper
And then it occurred to me that I could use the concept of a Butter Keeper -- a porous terracotta holder that keeps butter cool through water evaporation -- to achieve the same purpose. (Ironically, the type of Butter Keeper which inspired this activity actually keeps the butter cool by sealing out air, not by cooling it!)

We looked at some different types of evaporative coolers, including a similar metallic evaporative cooler invented by a student when she was in high school. We then gathered some materials and tried making our own. Although we did get some cooling, the Butter Keeper works is most effective in hot, dry climates. Here are the directions for our experiments:

The materials.

Materials:
  • room-temperature butter (we made a bowl of butter by whipping heavy cream; you could also soften some store-bought butter)
  • plastic wrap
  • digital food thermometer (about $15)
  • terracotta flower pots
  • terracotta flower pot dishes
  • disposable bowls and cups
  • sand
  • cloth (we used a bandana)
  • water
  1. Fill a small disposable cup with softened butter. Cover with plastic wrap
  2. Use the food thermometer to punch a hole through the plastic wrap and take the temperature of the butter.
  3. Use the materials on hand to design and assemble a Butter Keeper that will hold the cup of butter. The Butter Keeper should hold and absorb for an extended period. See the photos for ideas.
  4. Place the cup of butter in the Butter Keeper. Place another cup of butter next to it as a control. Check the temperature of both cups at regular intervals to see whether the butter in the Butter Keeper is cooler than the butter sitting outside at room temperature.


What We Did:

John built one using a cloth to wick up water from a dish holding the terracotta pot. This design was apparently used in Great Britain and Australia in the 20th century.

The preparation of John's experiment. The cloth wicked the water up over the pot to keep it wet.

John's experiment.
Anthony used a smaller container set into a terra cotta pot filled with sand and then dampened. That version comes from Africa, where it is known as a zeer, and is used to keep produce fresh in areas where electricity is unavailable.
The setup for Anthony's experiment.
The sand in this experiment serves the same purpose as the cloth in John's.
 What Happened: We assembled the Butter Keepers and set them out on a bench, next to an unprotected cup of butter. We kept the pots wet by periodically refilling the bowls as needed. When we started, the butter was 65 degrees. Within a few hours it had decreased to 62, while the control cup was at 70. While not a gigantic difference, it does show a noticeable drop in temperate, from both the un-refrigerated control and the actual room temperature. After a few days the butter did begin to smell bad, and we ended the experiment. Note: Our first thermometer, from Wal-Mart, died soon after we started. We bought a slightly better version from an upscale cooking equipment store, which worked fine.

Friday, December 3, 2010

Our Galileoscope


In Lecture 3 of The Joy of Science, Prof. Hazen talks about how Galileo used his telescope to explore the heavens, and was the first to observe the craters of the moon, sunspots, and Jupiter's moons. (In the process upsetting medieval European society by suggesting that the celestial bodies were not "perfect.")

We happened to have on hand a reproduction of Galileo's telescope, the Galileoscope. This inexpensive instrument was designed for student use during the International Year of Astronomy in 2009. Although it claims to have decent lenses, it is very lightweight and doesn't come with a stand, which makes it hard to use. We had never really used it, but this seemed like a good time to try again.

First, we set up the telescope for projecting sunspots on a piece of paper. (NEVER point a telescope at the sun!) Unfortunately, after checking SpaceWeather.com, we found that we had picked a day that the sun really did have no spots! However, we were able to see the disc of the sun. We will have to try this experiment again.


A few weeks later on a particularly cool crisp night, I noticed that Jupiter was clearly visible near the almost-full moon. I set up the Galileoscope on our front lawn. The moon and Jupiter were so bright that they could be observed even with the streetlights shining. I had never seen the moons of Jupiter through a telescope before, but they were clearly visible in the Galileoscope. The four Medici moons were lined up horizontally, three to the left of Jupiter and one to the right. About a month later, with the conditions almost the same, I pulled the telescope out and took another look. This time the line of moons was tilted down towards the left, and there were two moons on either side of Jupiter.


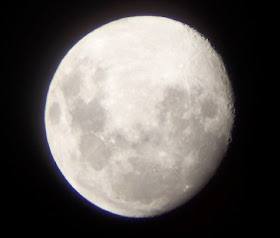
I was unable to take any photos of Jupiter with my little digital camera. (The image above is from Wikipedia.) So instead I pointed the Galileoscope at the moon and took some photos of it. The craters of the moon can be seen along the right edge. To get the photo, I held the set the camera for landscape (so the focus would be infinity) and held the lens a little bit away from the eyepiece. I lined up the image of the moon on the screen and then shot the photo. Pretty nice, right?


We also watched Bertoldt Brecht's play Galileo, which I have seen performed live. It does a good job of showing the conflict between the scientist and the Church. A good book for younger kids, which we read many years ago is Starry Messenger by Peter Sis. That is the title of a work by Galileo, which was part of a museum exhibit we saw called A Very Liquid Heaven. I was very impressed with the large meteorite (below) which was part of the combination art and science exhibit.

Tuesday, November 30, 2010

Magnets and Declination

In The Joy of Science, Lesson 11: Magnetism and Static Electricity, Robert Hazen explains that the Earth is itself a giant magnet. In the Northern Hemisphere, the north end of a compass will point down towards the magnetic North Pole. He described an experiment by Robert Norman in his book The Newe Attractive which showed the declination by floating a magnetized needle in a piece of cork in a container of water. By shaving away the cork, Norman got the needle to float below the water's surface so that it's dip toward the Pole could be seen.

We tried to recreate Norman's experiment from Hazen's description using a needle and a straightened paper clip as the magnetic pointers, and real and artificial cork and pieces of a Styrofoam cup as the floatation device.We did get the needle to point on a north-south axis. But it was hard to tell if the needle dipped, because the angle would change depending on where the cork was.

There's another description of Norman's experiment at Practical Physics. And Safe and Simple Electrical Experiments (viewable through Google Books) gives some alternate ways of observing the declination of the needle. You can find the magnetic declination for your position at NOAA's Geophysical Data Center.

Wednesday, November 17, 2010

First Law of Thermodynamics: Heating Sand by Shaking It


The first law of thermodynamics says that the total amount of energy in a closed system remains constant. There are many different forms of energy, and energy can shift from one form to another. So the total amount of energy in a closed system is the sum of all the different forms of energy added together.

To test this principle, we measured the temperature of sand in a Styrofoam cup.This experiment was suggested by Professor Robert Hazen in his video course The Joy of Science. In his video, he used a jar of sand. However, we decided to use insulated cups so we didn't have to open it to measure the heat. We first measured the sand's temperature, then we sealed the cup, shook it for about five minutes, and measured the sand again. The sand's temperature actually changed from 65 degrees Fahrenheit to 68 in just the five or so minutes we shook it.

Materials:

2 disposable insulated cups (we used Styrofoam)
masking tape
sand
and a food thermometer (the kind with a sharp metal probe.)

Procedure:
  1. Pour the sand into one of the cups until it is about three-quarters full. 
  2. Measure the temperature of the sand.
  3. Place the empty cup on top of the cup with the sand on it. Tape them together.
  4. Shake for five minutes.
  5. Poke the thermometer's probe though the top of one of the cups. Measure the temperature again. You should see the temperature go up a few degrees.
What Happened:

Shaking the sand is a form of kinetic energy. The friction of the sand particles rubbing against each other converts the kinetic energy to heat energy. Some of the kinetic energy also converts into the energy of sound waves, which you can hear while you shake the sand.

Wednesday, November 3, 2010

The Joy of Science

Image: SmartFlix
We have been watching Robert Hazen's lecture series The Joy of Science for about a month and a half, and we are really enjoying it. A six-DVD set from The Teaching Company, The Joy of Science consists of 60 half-hour lectures using the history of science as a way to organize the major connecting principles.

Although low-tech in production values (one reviewer found it annoying that Hazen talks to an imaginary studio audience and not the camera), the series breaks down important scientific concepts and developments into small chunks that are easy to understand.

Along the way, Hazen does little demonstrations that can be used as the basis for at-home experiments with kids. We've done a couple of these already, and my plan is to post about them so others using this course will have the activities at hand, ready to go when they get to the related episode.

Just a note: The Joy of Science, like most Teaching Company courses, is not cheap. As I write, they are on sale for $149.95, down from a regular $624.95! I was lucky enough to find a library in our lending system that was willing to send me each DVD set one at a time and keep it for an extended period. (The librarian admitted that no homeschoolers in her area were interested in it because it included evolution.) We were luckier still to discover that a family in our homeschool group owned the set and were willing to lend it to us for as long as we needed.

Sunday, October 3, 2010

Welcome to Integrated Science at Home!

Over the past three years, my family has created blogs documenting our study of chemistry, biology and physics. Unlike the standard public-school model of teaching science, however, we didn't approach our "courses" as lists of facts to memorize and formulas to learn. Instead, we tried to get a feel for what the science was looking at, why people who studied that science found it interesting, and what new topics were being explored. To do this I generally planned each year around a book or books aimed at a popular audience but sometimes including textbooks, which I used to figure out what topics and basic ideas I thought we should include. To present the actual material, we used lots of videos, both DVD sets borrowed from the library and videos we were able to stream online. We took field trips, attended lectures, and talked to actual scientists and professors who encouraged us in our approach. And we did lots of experiments and activities that made us look and think and play around with the science concepts being studied. The result was a focused look at a few topics rather than a broad-based overview of each discipline.

This year, instead of circling back around to a subject we'd already covered, we're trying something different: We're going to look at science from an integrated viewpoint, hopefully going over the basic concepts we may have glossed over earlier, and seeing how it all fits together. Our spine for the year is the college-level text The Sciences: An Integrated Approach by James Trefil and Robert M. Hazen. We also watching Hazen's Teaching Company video lecture series The Joy of Science.

And I've just started looking for activities and experiments to go along with our studies. Because we haven't done Earth and Space science for a while, I'm going to concentrate on finding labs in these areas. And one interesting discovery I am making is that middle schools, high schools and colleges are starting to use Astrobiology as the basis for integrated science courses for non-majors. This sounds like a very interesting way to explore the interaction of all the sciences, and I'm very excited to see what turns up. As always, I'm going to be looking for free and low-cost materials and activities we can do at home. I'll also keep an eye out for local colleges and museums that can offer opportunities for my family to learn about this branch of science.

So look for a growing list of Astrobiology and other integrated science resources in the sidebar and in these posts!

Saturday, October 2, 2010

Now Blogging at GeekMom with Mythbuster Kari Byron!

I've been busy the past few months helping to launch GeekMom, a site dedicated to moms who want to share their geeky passions with their kids. To start us off, we've got MythBusters host Kari Byron writing about her new adventure as mom to a one-year-old girl. Kari is also the host of the new hour-long kids' show Head Rush. Check us out!

And I'll still be blogging at GeekDad, so be sure to stop by there too!

Saturday, September 18, 2010

What I've Seen in the Skies


One of the challenges of science this year will be finding experiments, demonstrations or projects that can be considered "labs." And because it's been a while since we covered earth and space science, that is one area I'd like to include. As I write this, we're in the Adirondack Mountains, and the sky watching is amazing. From our not-particularly-dark hotel parking lot at sometime after 4 in the morning, I can see stars blanketing the heavens. Orion, the Big Dipper, and the Plaides stand out like beacons, and one of the planets, perhaps Jupiter, hangs halfway across.

It made me think that having the kids make up a sky survey, much like the nature survey we did when we were starting biology, would be fun to do. In their lifetimes we've seen many interesting phenomena (whether they still remember them, is a question though). But just a sampling includes solar and lunar eclipses, a meteor storm (many times heavier than a meteor shower), a spectacular double-tailed comet, and the aurora borealis.

I'll have to do some research to find out what worthwhile things will be happening in the skies in our region this year that we might be able to spot with our bare eyes or our Galelioscope. I'll also check out local observatories to see if there are any public programs the kids would be willing to attend. It might be nice to take another trip to the mountains -- perhaps somewhere more remote -- to do some more productive skywatching.

As I'm standing in the parking lot formulating this plan, I swear a meteor flashed a small arc across the sky.

I'm taking it as a sign.